Illusion Aligners – Key Features
Illusion Aligners are engineered with advanced materials and smart design solutions to deliver precise, predictable, and patient-friendly orthodontic outcomes.
- Built with an elastomeric core sandwiched between two resilient outer layers.
- Provides the optimal balance of strength and flexibility, enabling complex, multiplanar tooth movements.
- Ensures durability and consistent force delivery, while maintaining patient comfort throughout treatment.
- Hooks are seamlessly incorporated into the aligner design itself.
- Eliminates the frequent need for bonded auxiliaries.
- Allows for efficient attachment-free mechanics, enhancing esthetics, simplifying treatment, and improving compliance.
- A modern, removable alternative to traditional screw-based expanders.
- Metal-free design provides a comfortable, non-invasive option for gradual and predictable palatal expansion.
- Especially effective for growing patients, offering reliable results with improved acceptance.
- Incorporated into the aligner to support mandibular advancement.
- Provides a patient-friendly solution for Class II correction without bulky appliances.
- Delivers growth-friendly outcomes while maintaining comfort and predictability.
- Designed to accommodate erupting permanent teeth during treatment.
- Ensures smooth eruption pathways and natural occlusion without interference.
- Particularly beneficial for mixed dentition cases, allowing uninterrupted progress.
Illusion Aligners integrate biomechanical innovation with patient-centered design, enabling doctors to treat a wide range of malocclusions with greater efficiency, predictability, and comfort.
Aligner Clinical Guides
This manual provides detailed guidance on how to address common challenges during aligner therapy. Each scenario includes what you, as a clinician should check, and what you should instruct your patients to do.
1. Aligner Fit Issues
-
New aligner feels tight
It is normal for patients to report significant tightness or pressure for the first 1–3 days after switching to a new aligner.
This is not a problem but rather an indication that active tooth movement is occurring.
Reinforce to patients that they should not remove aligners due to discomfort but should instead increase usage of chewies or a rolled tissue to seat the aligner fully.
Explain that discomfort will decrease after the teeth begin to adapt, usually within a few days. -
Aligner feels loose
If an aligner feels loose from the beginning or does not snugly grip the teeth after 2–3 days of wear, it may indicate poor compliance or a tracking issue.
Inspect prior aligners — a genuinely worn aligner will show some discolouration, polish, or mild distortion. If it looks new, suspect reduced wear time.
If compliance is not the issue, consider that the aligner may not be tracking due to excessive movement in staging or unrecorded spaces. In such cases, plan for a refinement or new scan. -
Aligner not seating on specific teeth
A common problem is when an aligner fails to engage with one or two teeth.
Advise the patient to increase their wear time and use chewies multiple times a day to help those teeth “catch up.”
If the issue persists, evaluate whether attachments are missing or if the staging is too aggressive.
In more stubborn cases, order a refinement or new scan.
2. Lost, Broken, or Damaged Aligners
-
If more than 7 days into wear
Instruct the patient to move forward to the next aligner in sequence.
Inform them it may feel tighter than usual, but consistent wear will help adaptation. -
If less than 7 days into wear
The tooth movement is incomplete, so moving ahead may cause discomfort or poor fit.
Instruct the patient to go back to the previous aligner until you can supply a replacement or reassess the case. -
Doctor’s role
Always document such incidents in the patient record.
At the next check-up, carefully evaluate tracking and ensure no loss of progress occurred.
3. Gingival or Soft Tissue Issues
-
Impinging edge or irritation
Extremely rare but sometimes the aligner edge may press into the gingiva, causing discomfort or ulceration.
Patients should never attempt to trim aligners themselves as this can cause damage or sharp edges.
You should smooth or adjust the edge in-office using appropriate rotary tools, ensuring the aligner maintains its structure.
In severe cases, contact the Illusion Aligners Team for the best advice and support. -
General soreness
Mild soreness in the first few days of each aligner is common and indicates that teeth are moving.
Over-the-counter analgesics can be recommended if pain is significant but emphasize that these should be used sparingly and only when necessary.
Educate patients that consistent aligner wear usually reduces discomfort faster than intermittent removal.
4. Occlusion & Spacing Concerns
-
Posterior open bite (back teeth not touching)
This can occur near the end of treatment, often due to the thickness of aligner plastic preventing full occlusal contact.
In most cases, the bite self-corrects within two weeks after aligners are stopped, as teeth naturally settle into occlusion.
If the open bite persists or interferes with chewing, consider refinement. -
Persistent gaps or open contacts
These may arise from incomplete interproximal reduction (IPR) or missed small spaces during scanning.
Always use an explorer or thin-feeler gauge to detect these clinically, since they can be missed digitally.
If found, document thoroughly and include them in a refinement order.
Remind patients that excessive flossing at the end of treatment can also worsen spacing, creating unwanted “black triangles.”
5. Attachments & Auxiliaries
-
Attachments are critical
Attachments are critical for directing certain tooth movements (rotations, extrusions, torque).
If an attachment debonds, replace it as soon as possible.
Evaluate whether the current aligner still fits properly without the attachment. If it does not, a replacement aligner may be necessary. Contact Team Illusion Aligners for the best support.
Delays in replacing attachments can lead to tracking problems and wasted aligner stages.
6. Compliance Assessment
-
Aligner condition
A compliant patient’s aligner will appear slightly worn, flexible at edges, or mildly discoloured.
A “brand new” look after 7+ days suggests poor wear.
Excessive staining often means the patient is eating or drinking (other than water) while wearing aligners. -
Questioning for cues
Ask how many hours per day the aligner is worn, whether they have skipped overnight use, or if they remove aligners for meals and snacks.
Probe their problem-solving: “If an aligner feels loose, what do you usually do?” — These questions uncover habits and potential compliance gaps.
The First Delivery Appointment
The first delivery appointment is critical. It establishes both the clinical foundation (fit and function) and the patient’s understanding of how to manage aligners. Poor instruction at this stage is one of the leading causes of compliance issues.
1. Pre-Delivery Clinical Checklist
Before handing over the aligners:
- Fit check: Insert the first set of aligners and confirm a precise fit across all teeth.
- Attachments/Auxiliaries: Verify they are correctly placed and fully engaged by the aligner.
- Demonstration: Show the patient how to use chewies, aligner removal tool, or tissue rolls to seat aligners.
- Simulation review: Walk through the digital treatment plan with the patient. This helps set realistic expectations about treatment length, potential refinements, and final outcomes.
- Baseline documentation: Take photographs (with and without aligners) to establish a record for future comparisons.
2. Key Patient Instructions (to be explained clearly at delivery)
-
Wear Schedule
Patients must wear aligners 20–22 hours daily.
They should only remove them for eating, drinking anything other than water, and performing oral hygiene procedures.
Explain that less than 20 hours/day significantly reduces treatment effectiveness and predictability. -
Insertion & Removal
Show patients how to insert aligners front-to-back, ensuring a secure fit.
Always emphasize the importance of using chewies/tissue rolls for complete seating.
Removal should begin at the molars and progress gently across the arch — no forcing or use of sharp objects, encourage the use of Aligner Removal Tool. -
Cleaning & Storage
Advise rinsing aligners with cool water before reinsertion to reduce bacterial load.
Advise gentle brushing of aligners with a soft toothbrush and mild soap, twice a day.
Hot water, bleach, or harsh cleaning agents should never be used as they damage the aligner.
Stress the importance of always using the provided case — most people lose aligners when they wrap them in napkins. -
Meals & Beverages
Aligners must be removed before any meal or drink other than water.
Before reinsertion, the patient should perform thorough rinsing and ideally brush to reduce the risk of decay and odor.
Explain that food and sugar trapped under aligners accelerates caries and gum inflammation. -
What’s Normal
Prepare patients for mild tightness, soreness, or speech changes in the first few days.
Let them know that saliva flow may temporarily increase.
All these symptoms resolve naturally, and they are positive signs of progress.
3. Points to Emphasize as a Doctor
- Chewies are non-negotiable: Reinforce that complete seating is essential for tooth movement to occur predictably.
- No self-adjustments: Patients should never trim or alter aligners at home. Issues must be brought back to the clinic.
- Refinements are normal: Prepare patients to expect them as part of the process. Framing refinements as “fine-tuning” avoids disappointment.
- Compliance aids: Recommend practical tools like reminder apps or phone alarms to help patients maintain consistent wear.
Retainers
Retainers are a critical part of orthodontic treatment. Once active aligner therapy is complete and attachments are removed, retention ensures the teeth remain in their corrected positions. The following points should be communicated clearly to every patient at the time of retainer delivery.
1. Full-Time Wear Phase (First 3–6 Months)
- Initially, patients must wear their retainers full-time (day and night, including during sleep) immediately after the removal of attachments.
- Retainers should only be removed for meals, drinking anything other than water, and oral hygiene.
- This intensive phase typically lasts 3 months but can be extended to 6 months based on case stability and clinician preference.
- Emphasize that this period is crucial for preventing relapse as the teeth and surrounding tissues are still adapting to their new positions.
2. Night-Time Wear Phase (Lifelong Maintenance)
- After the first 3 to 6 months, patients can transition to night-time only wear.
- Retainers must be worn every night, indefinitely, to preserve treatment results.
- Reinforce that teeth naturally shift with age, even in individuals without orthodontic treatment. Long-term retention is the only way to ensure a stable smile.
- Educate patients that the first two years post-treatment are especially critical, any lapses in retainer use during this period increase the risk of relapse.
3. Monitoring Fit and Signs of Relapse
- Instruct patients to pay attention to how their retainers feel:
- If retainers start feeling unusually tight, this suggests early tooth movement.
- If patients notice visible shifting of teeth, they should contact the clinic immediately.
- Offer routine retainer check-ups as part of your post-treatment care.
4. Retainer Care & Maintenance
- Cleaning: Brush retainers with a soft toothbrush and mild soap. Avoid toothpaste or abrasive products, which can scratch the retainer material.
- Temperature: Keep retainers away from heat sources (hot water, boiling, microwaves, car dashboards, washing machines). Heat will distort the plastic.
- Storage: Always store retainers in the protective case provided. Never wrap in tissues or napkins, as this is the most common cause of accidental loss of retainers.
- Pets: Keep retainers out of reach - pets are notorious for chewing them.
- Oral hygiene: Patients should brush teeth after meals before reinserting retainers. If brushing is not possible, rinsing thoroughly with water is the minimum standard.
5. Replacement and Longevity
- Retainers typically last 1–2 years with proper care, but patients who grind or clench their teeth may wear them out sooner.
- Recommend duplicate retainers where possible, so patients always have a backup. This prevents relapse in case of loss, damage, or stretching.
- Advise patients to try on a duplicate retainer every 6 months. If it feels significantly tighter than the one in use, the current retainer has stretched and should be replaced.
- If a retainer is lost, broken, or no longer fits due to poor compliance, a new scan and fabrication will be required. Inform patients that replacement usually incurs a cost.
6. Additional Patient Guidance
- Retainers must be removed before eating. Drinking water is permitted, but other beverages may stain retainers and trap sugars against teeth.
- Patients should not chew gum or smoke while wearing retainers, as this will damage or discolour them.
- Encourage patients to bring retainers with them during professional dental cleanings for inspection.
- Explain to patients that retention is not a temporary phase but a lifetime commitment. Clear communication at delivery, backed with written instructions, significantly improves compliance and long-term outcomes.
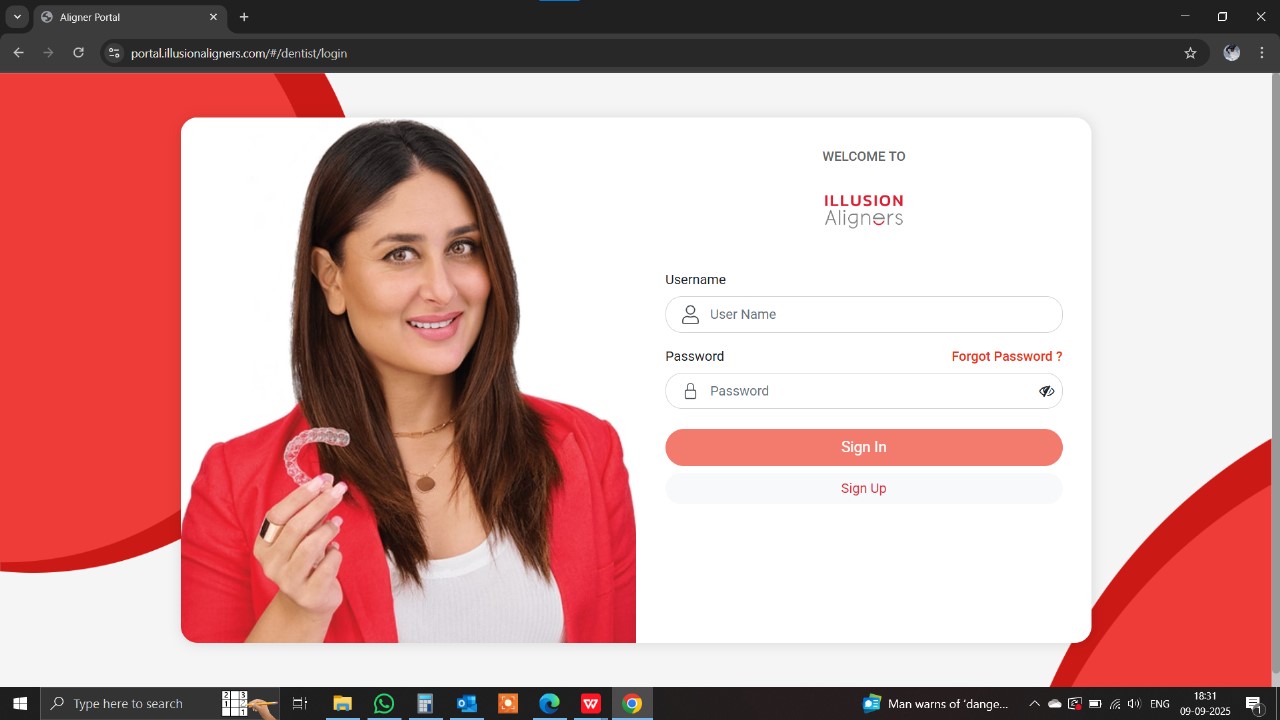
The Illusion Aligners Portal is your central hub for managing all aligner cases. Every update, plan, and case record is uploaded here and can be accessed anytime by logging in with your credentials.
Step 1: Log in to the Portal
Visit: Illusion Aligners Portal Login
Use your ID/Code (mentioned in previous invoices or can be availed from Illusion CRM Team)
Your User ID will serve as both the login ID and password
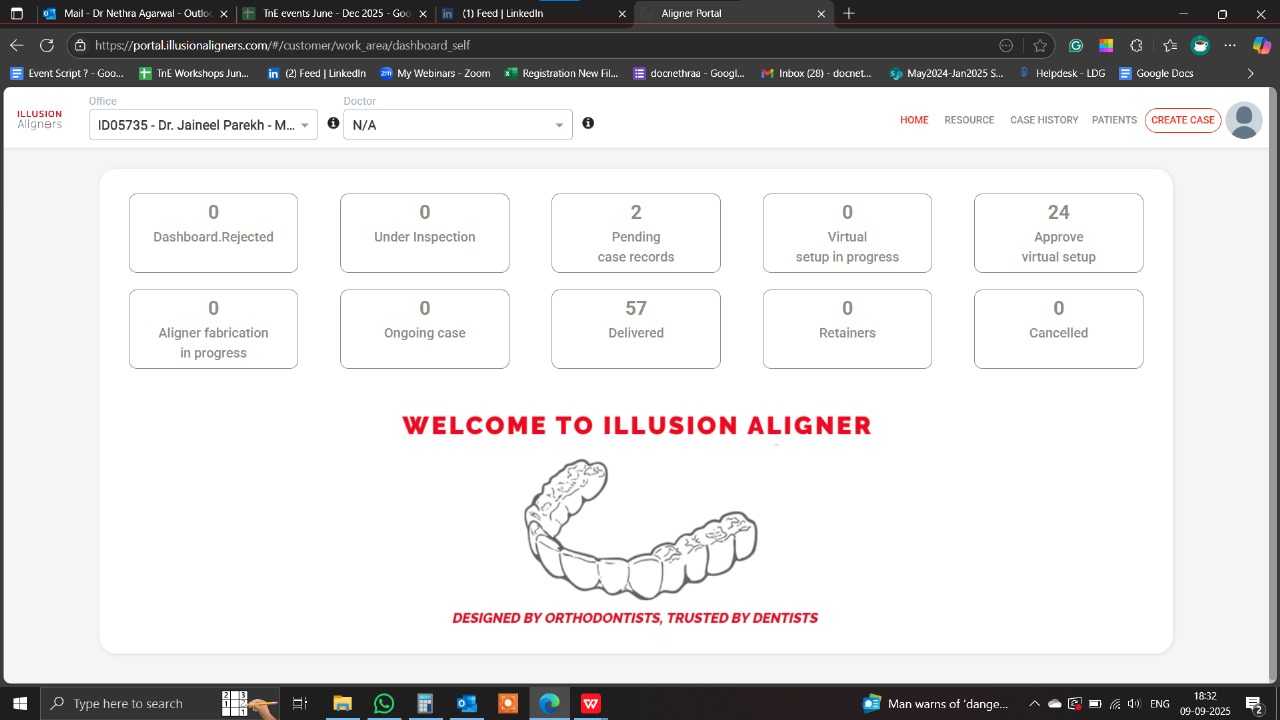
Once logged in, you will arrive at your Dashboard, where all your submitted cases are listed.
Step 2: Start a New Case
On the Dashboard, click “Create Case” (top right corner)
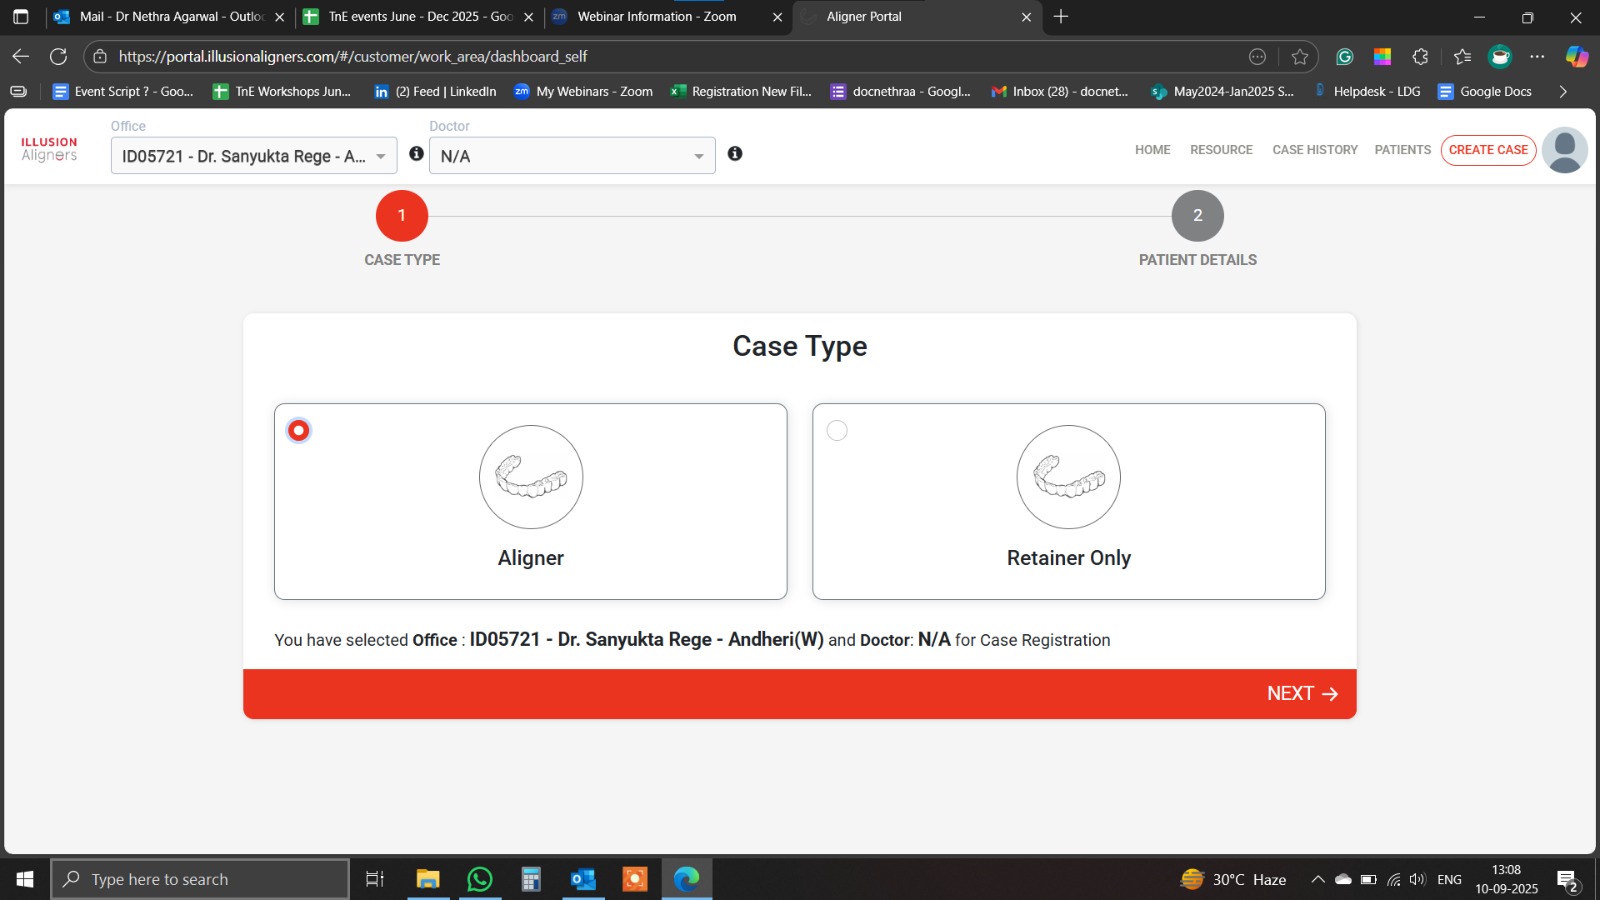
Choose one of the two options:
Aligner → for a new aligner treatment case
Retainer → for fabrication of retainers only
Step 3: Select Case Type (Plan Type)
You will be asked to select the Plan Type
Choose the appropriate option depending on your requirement
For demonstration purposes, here we will select New Case
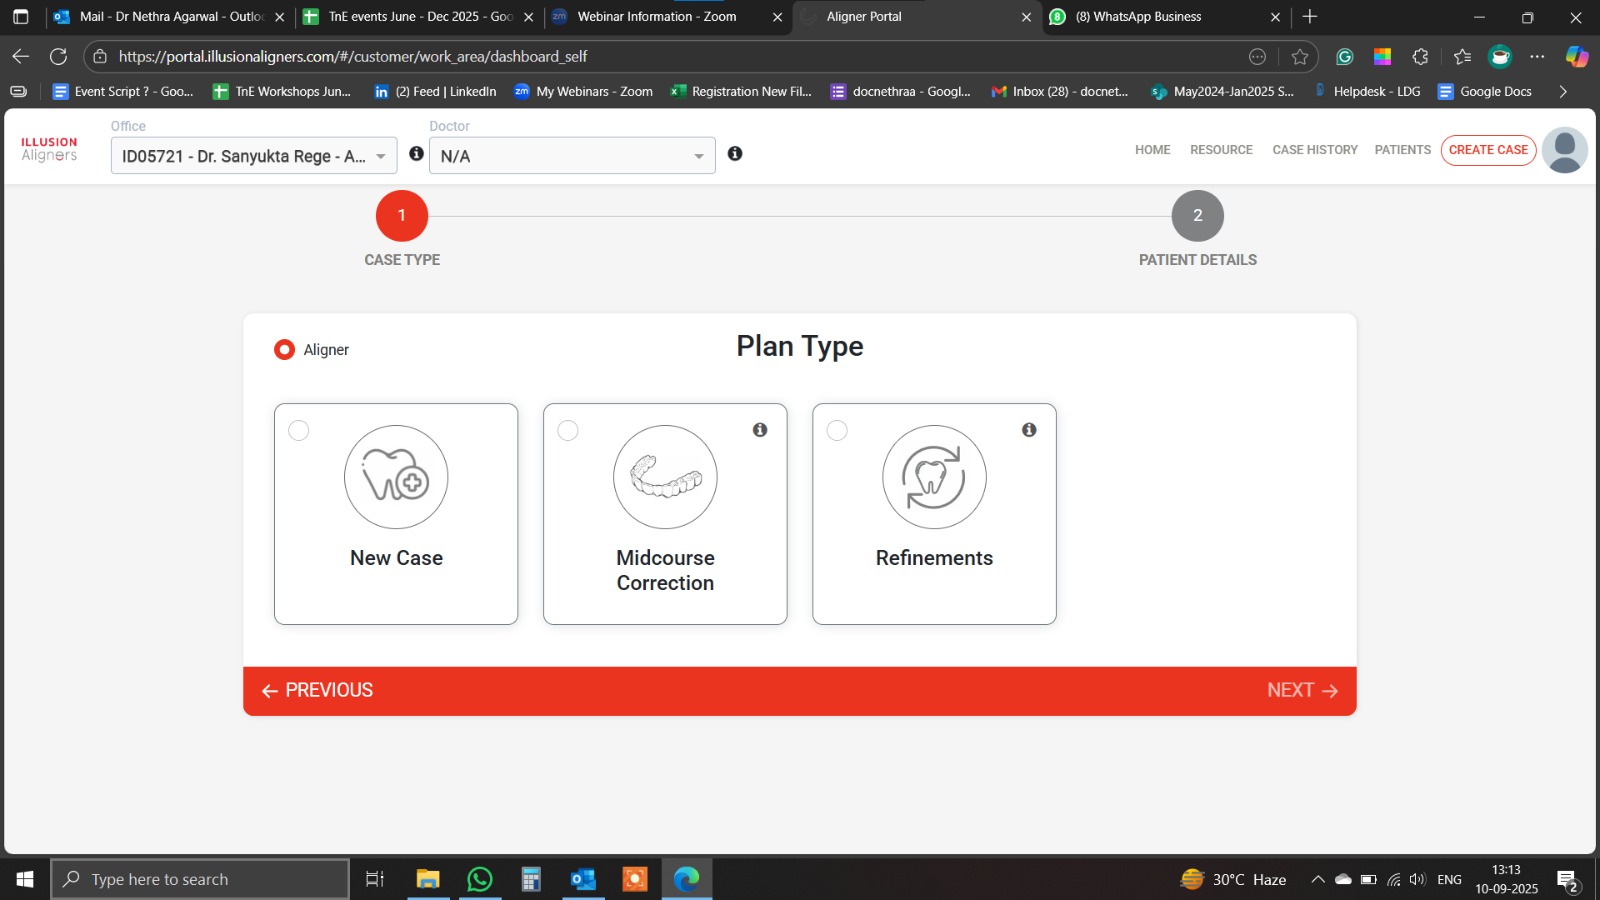
Step 4: Enter Patient Details
Fill in all mandatory patient information as requested
Check all entries carefully, since this information will be referenced throughout treatment
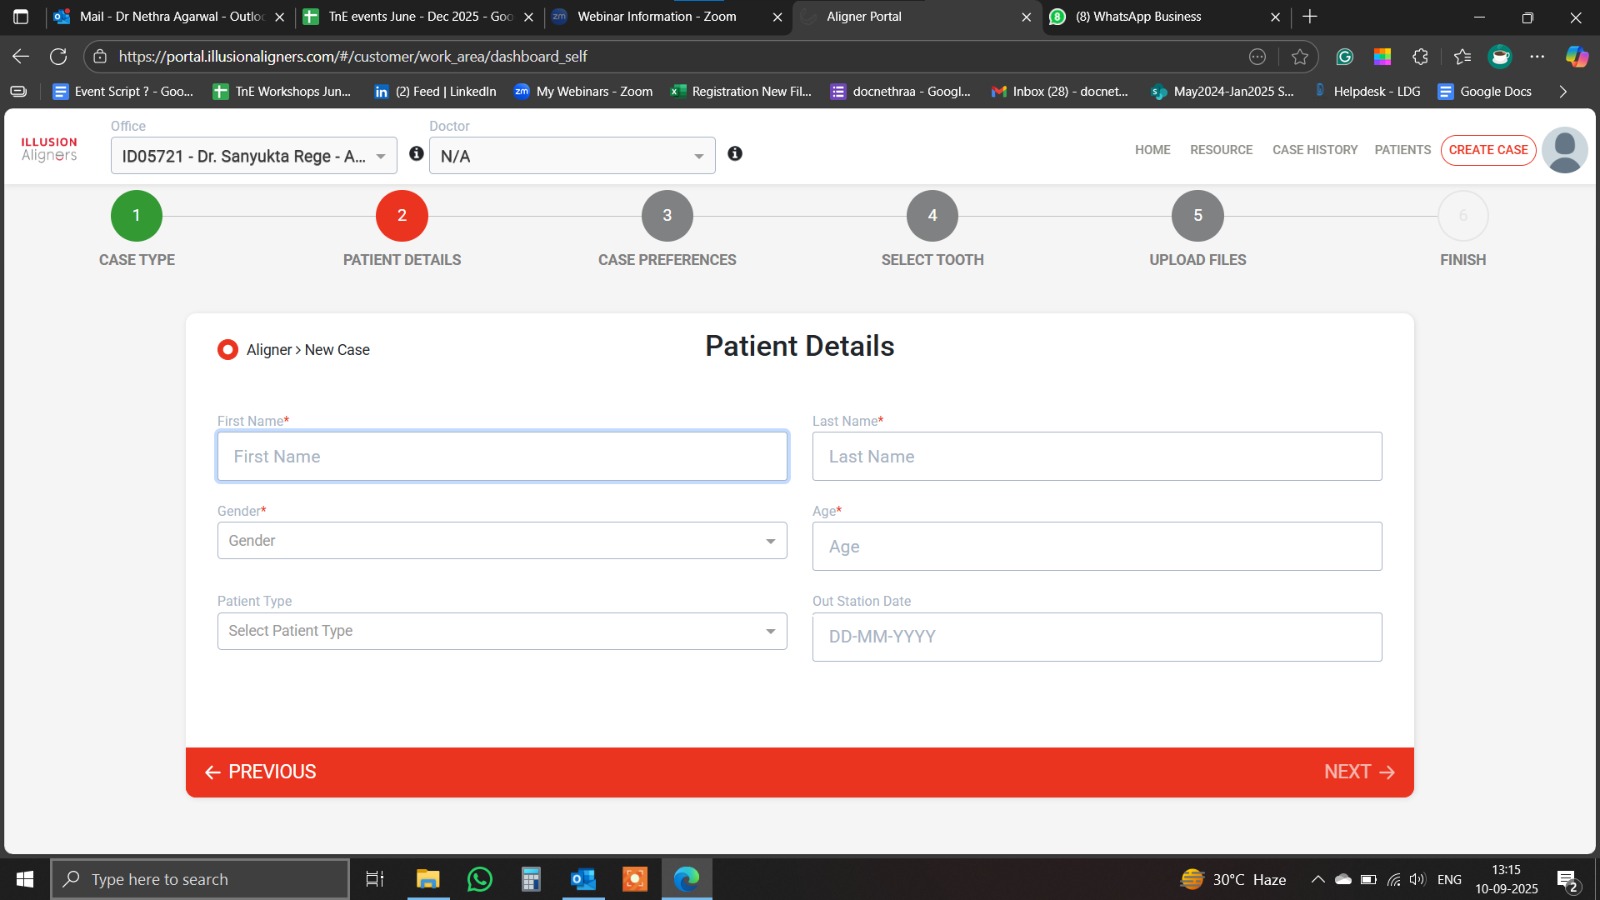
Step 5: Add Case Preferences
On the Case Preferences page, select all required details
Pay attention to the fields marked with an asterisk (*) as these are mandatory
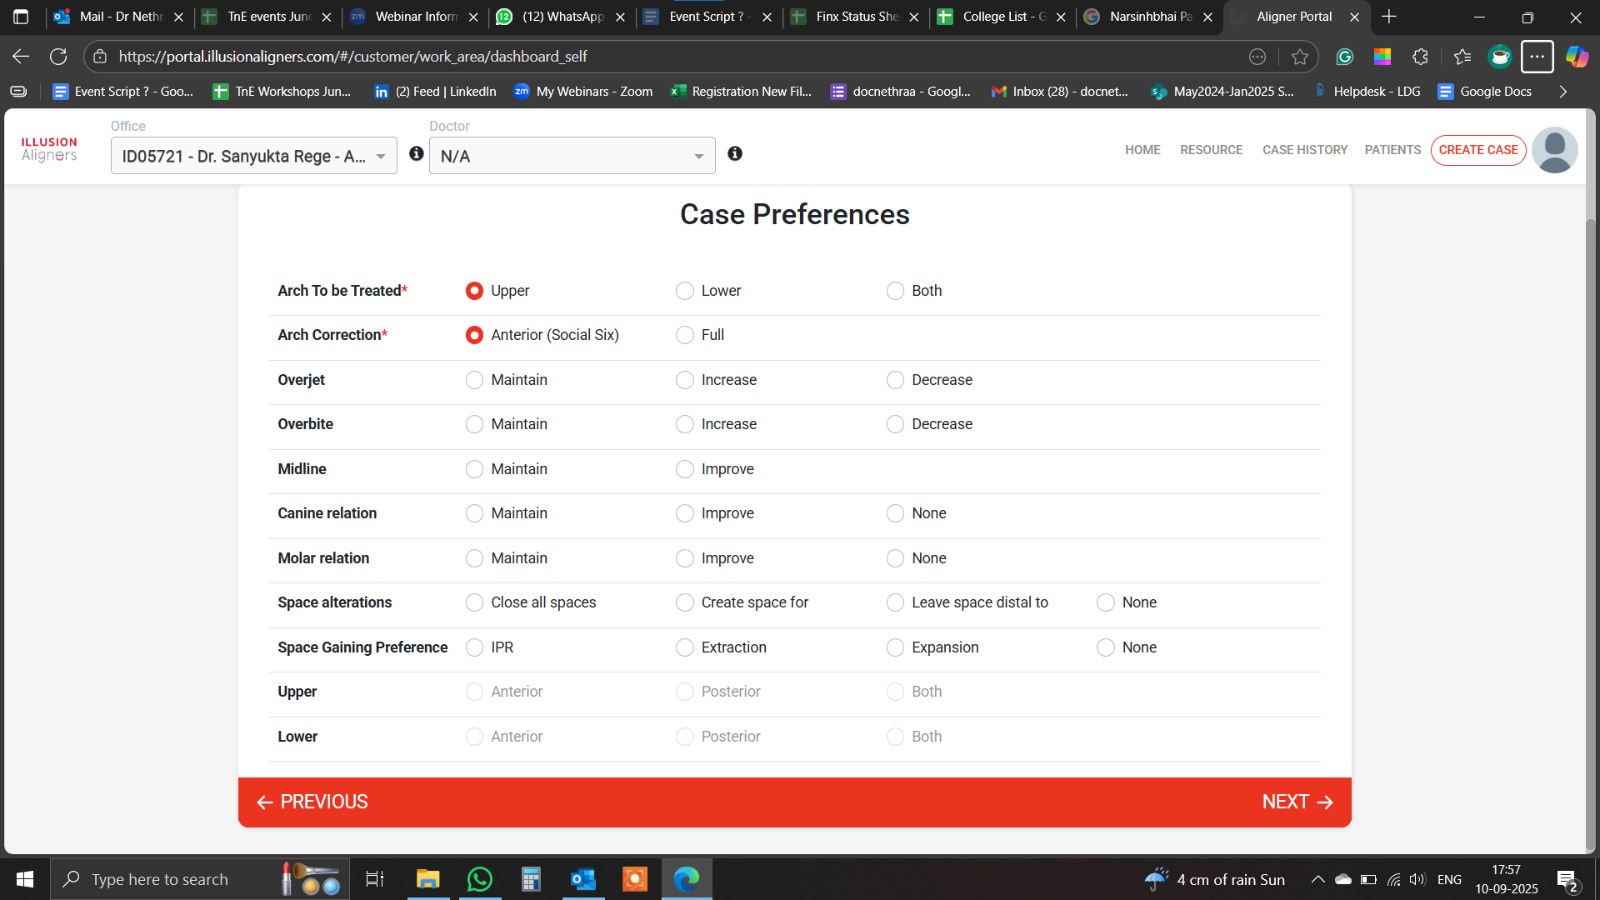
Step 6: Tooth Movement Restrictions
In this section, indicate specific limitations for the case:
Mark crowns and implants in the arch
Identify any teeth where attachments should not be bonded
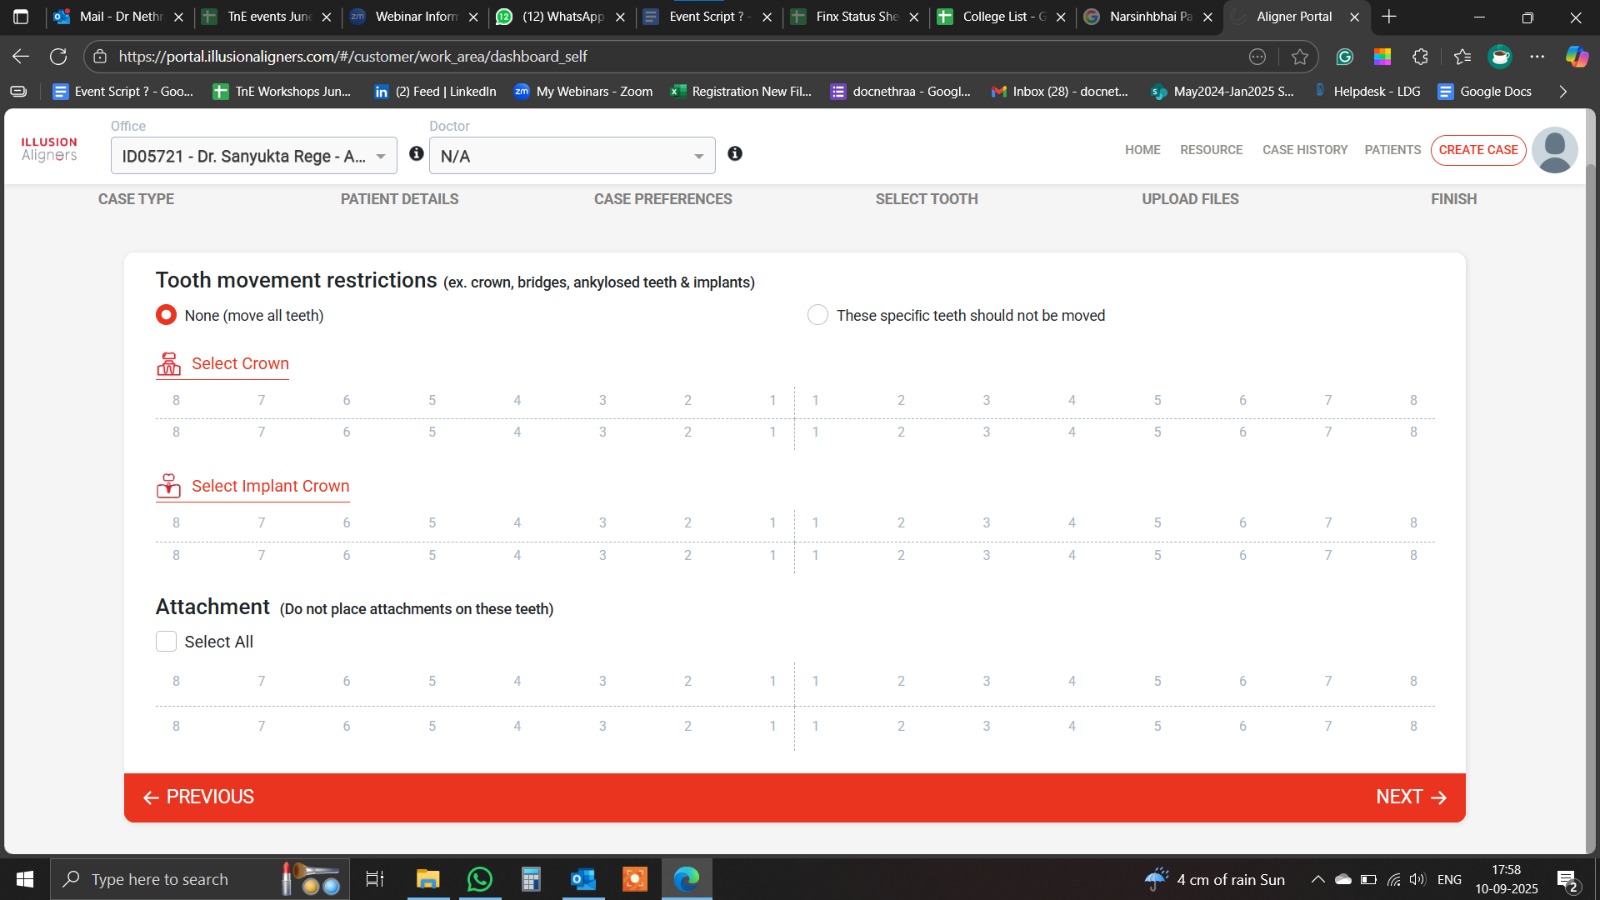
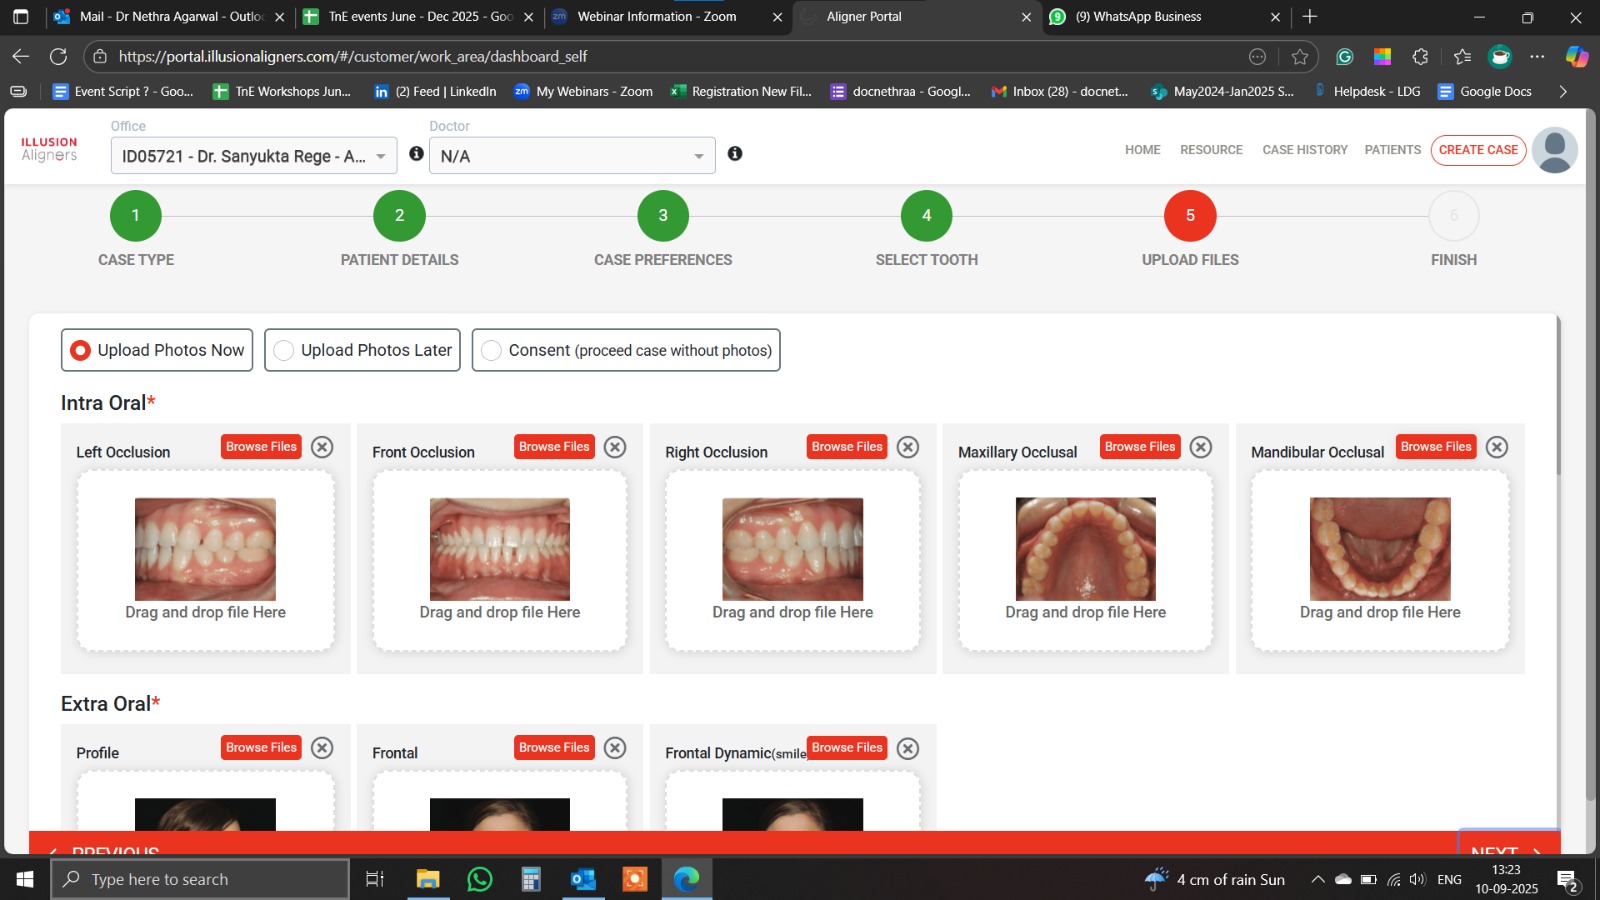
Step 7: Upload Clinical Records
You will need to upload the following files:
Intraoral Images (5 views)
Frontal view in occlusion
Left view in occlusion
Right view in occlusion
Maxillary occlusal view
Mandibular occlusal view
Extraoral Images (3 views)
Frontal view
Left or right profile view
Frontal smiling view
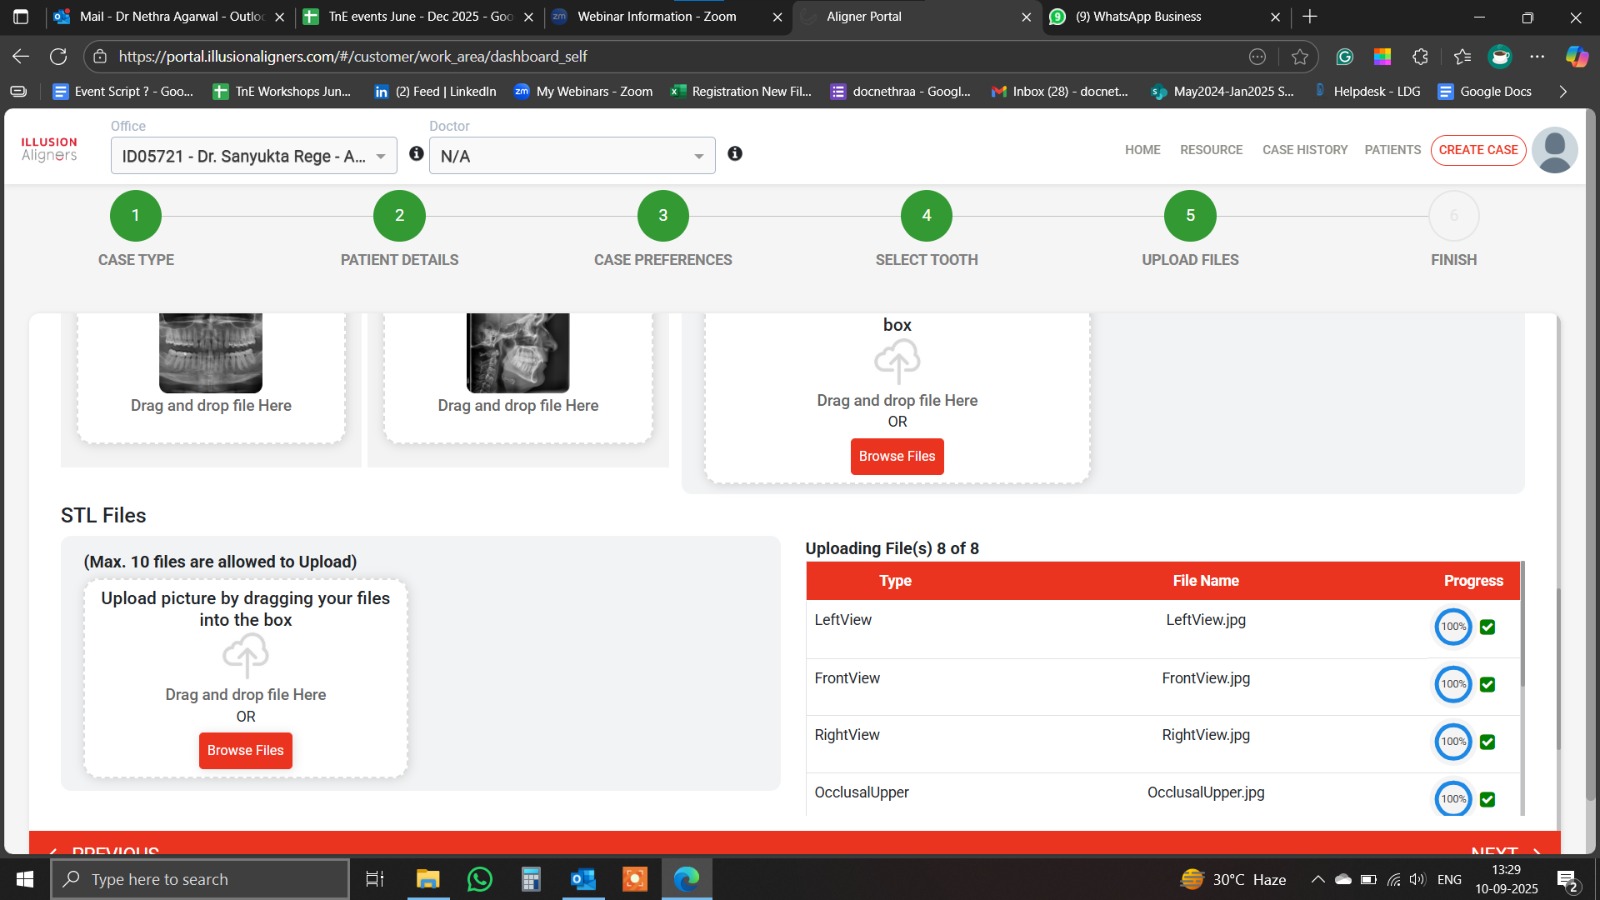
Radiographs
Lateral Cephalogram (Lat Ceph)
Orthopantomogram (OPG)
CBCT (if indicated)
Intraoral Scan STL Files
Upload intraoral scan files if your scanner is not directly integrated with the Illusion Aligners lab.
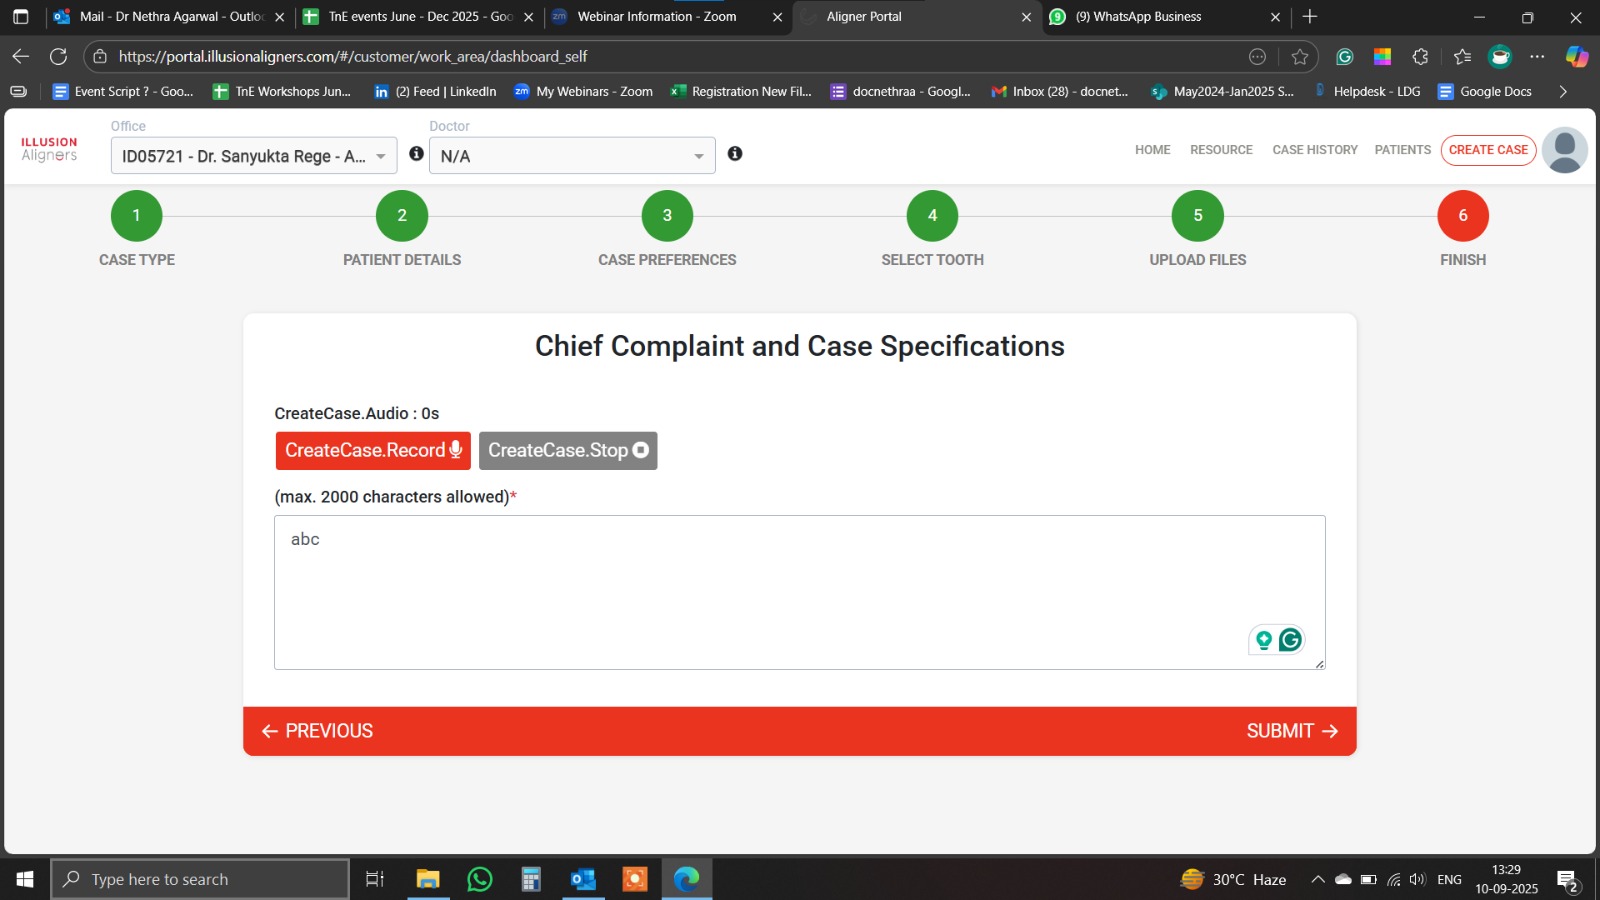
Step 8: Chief Complaints & Case Specifications
Add your treatment instructions either as:
Audio recording, or
Written summary
Be specific about the treatment objectives
Example Instructions:
Move only anterior teeth
Maintain posterior occlusion
Do not move specific teeth
Preserve or maintain spaces between certain teeth
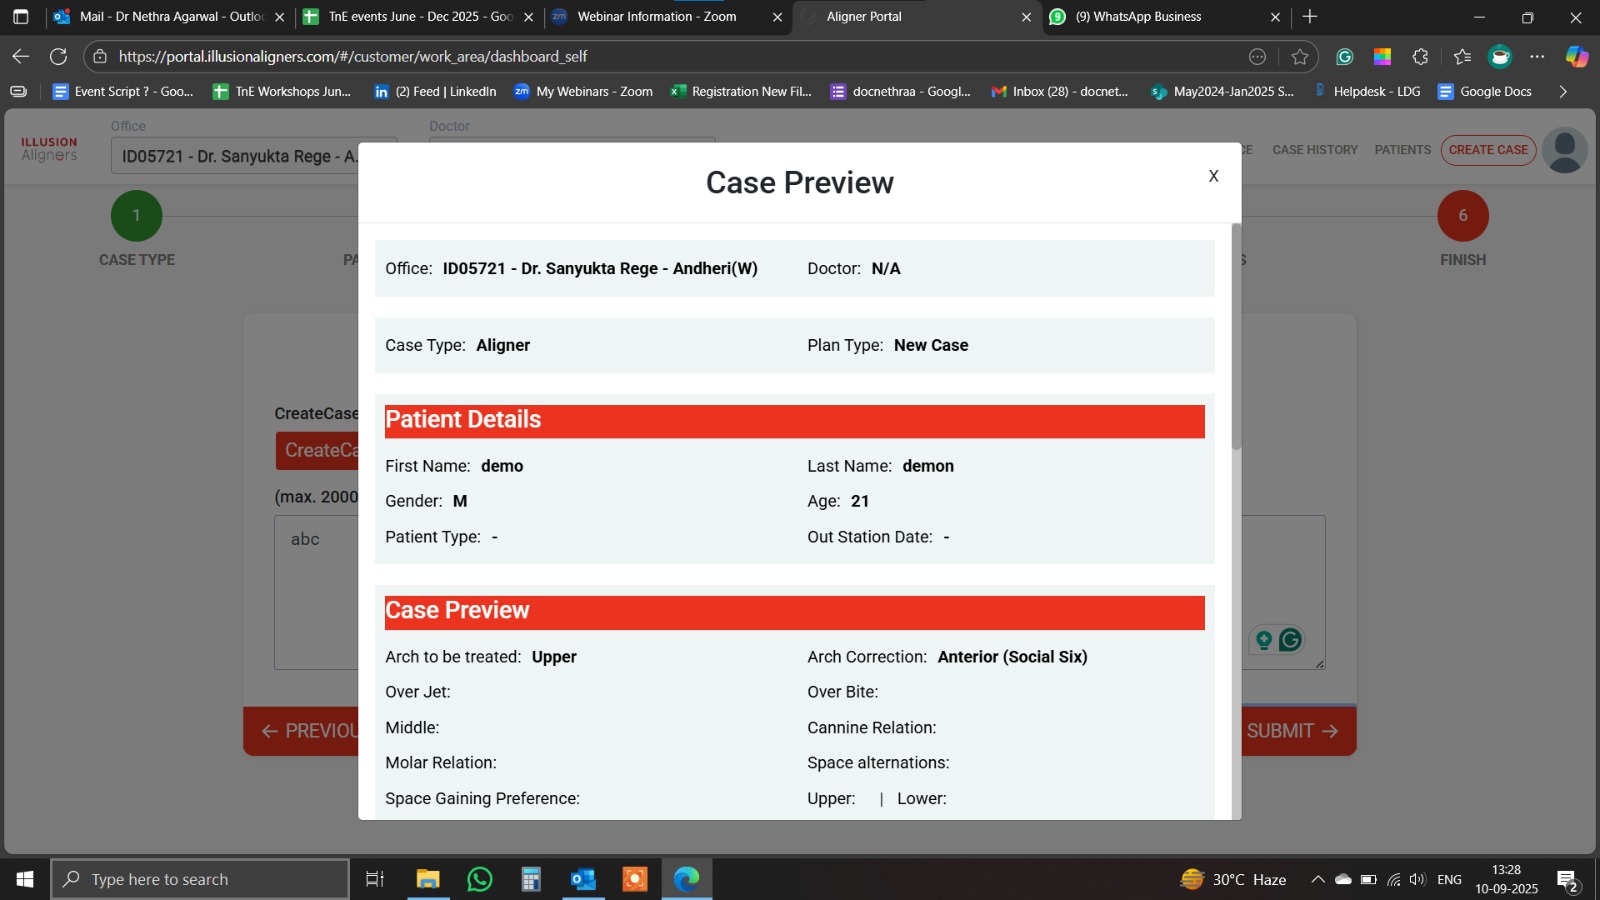
Step 9: Review & Submit
A Case Summary will be generated with all the details you have entered
Carefully review the information
If changes are needed, edit the information
If all is correct, select Confirm to submit
Once submitted, your case will appear on the Dashboard and will be processed by the Illusion Aligners team.
Aligner Case Tracking: Step-by-Step Process
-
Step 1: Digital Intraoral Scan
Begin by capturing a detailed intraoral scan of your patient. -
Step 2: Upload to the Aligner Portal
Submit the scan on our secure aligner portal, along with all the required case details/ contact Illusion Aligners Team for support or queries. -
Step 3: Advanced Case Analysis
Our experts use state-of-the-art software to generate before-and-after superimpositions of pre vs achieved and planned vs achieved tooth positions.
Green highlights indicate achieved tooth movements
Pink highlights indicate areas of lag that need attention -
Step 4: Tracking Report & Revisions
You will receive a comprehensive tracking report directly via email, along with any recommended revisions to the treatment plan
How to Read the Treatment Plan Report
- I Part: The treatment plan report starts with the name of the patient, along with the patient code, and the QR code for the virtual set up.
- II Part: The flowchart shows maxillary arch on the left and the mandibular arch on the right, with their respective template counts, aligner counts, and retainer counts.
- III Part: The set of images show the initial position and the expected final positions of the teeth of your patient as per the virtual treatment plan.
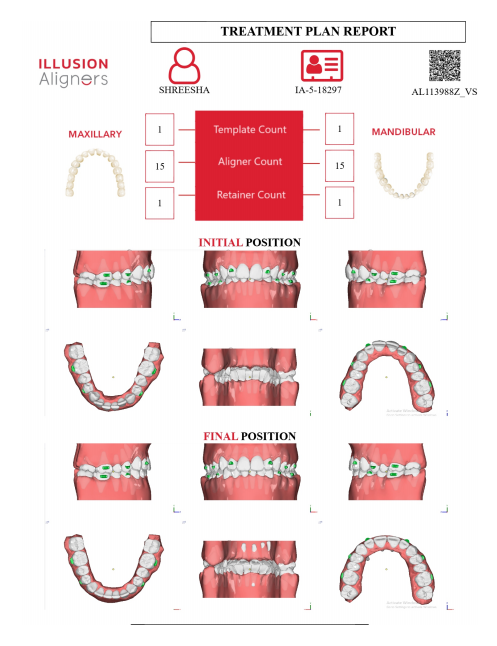
- I Part: The top part shows the aligner count of the maxillary and the mandibular arch.
- II Part: Highlights the material options (PRO/FLX), recommended wear time and planned treatment duration for the treatment.
-
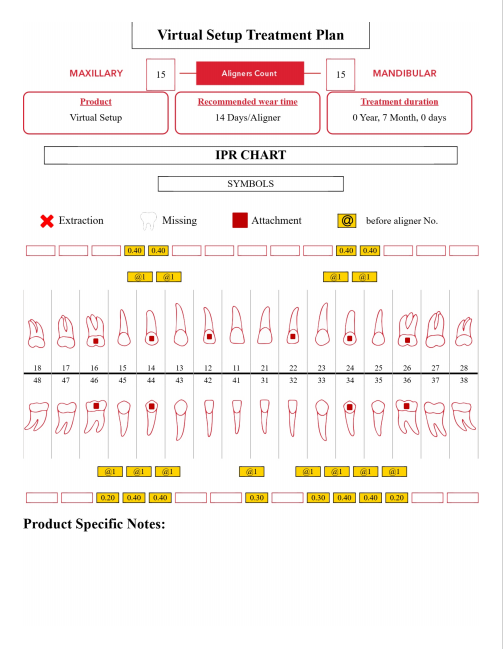
II Part: IPR Chart - (interproximal reduction chart)
First line contains the index for the symbols, as follows:- Extraction
- Missing
- Attachment
- @ Before Aligner Number
For interpretation,
As per the chart given below, In the 1st quadrant IPR of 0.40 mm to be done before aligner no. 1, between 13-14 and 14-15.The IPR chart for the remaining 3 quadrants to be interpreted in a similar manner.
-
Tooth Movement - Maxilla
In the first table, the expected tooth movement in the maxillary arch is represented in a tabular format in degrees or millimetres as per the specified movement type. -
Tooth Movement - Mandible
In the second table, the expected tooth movement in the mandibular arch is represented in a tabular format in degrees or millimetres as per the specified movement type. - Tooth movement tables to be referred for correlation. For detailed interpretation, please reach out to the orthodontist.
- Additional instructions: Additional general or case-specific instructions, as required for the case.
Understanding the treatment planning PDF will enhance your aligner clinical understanding and increase confidence to successfully meet the aligner treatment protocols.
 © 2026 Illusion Aligners. All Rights Reserved